Tuesday, June 24, 2008

How to Install the Lithium Backpack to your Arduino

The Arduino is an open source hardware input and output circuit and the Lithium Backpack is a Ardino accessory that will power the Arduino when it is away from a computer or a wall power. These products are sold at Liquidware for under $34 each.
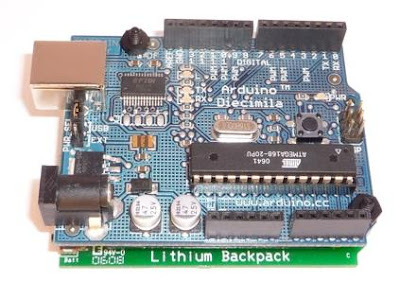
Step 1: Plug in the battery connector to the board. The black wire should face the outside (away from the battery).

Step 2: Attaching the Backpack allows the Arduino to be portable Use the 2 plastic screws, spacers and nuts to attach the Backpack to the back of the Arduino.
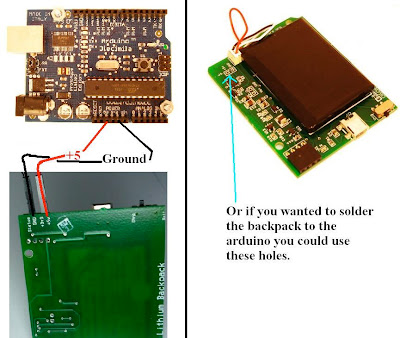
Step 3: Plug the Ground pin in with 22-24 gauge solid core wire.
Black wire is recommended to avoid confusion.The wire will connect the Ground on the Arduino to the Ground on the Lithium Backpack.
Step 4: Plug the +5V pin in with 22-24 gauge solid core wire
Red wire is recommended to avoid confusion.The wire will connect the +5V pin on the Arduino to the +5V pin on the Lithium Backpack.
Step 5: To power your Arduino flip the switch to the right position
Batt is the position that provides +5V to the 5V pin.

Step 6: The USB port on the Backpack is used to charge the Backpack
The switch should be flipped to the left position (Charg) when charging the battery.The orange led will be on when the battery is charging.The Backpack can be charged in 3 different ways.

1.) Through the USB Type B-Mini Female port on the Lithium Backpack when it is attached to a computer.
2.) Through the Arduino when the Backpack is plugged into the Arduino and the Arduino is plugged into a computer.
3.) Through the Arduino when the Backpack is plugged into the Arduino and the Arduino is plugged into a wall power supply.
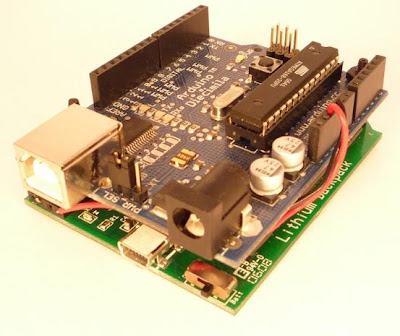
Step 7: Backpack Theory


Thursday, June 19, 2008

The shrinking world we live in

Downsizing has really hit the a lot of places really hard. Companies are laying off people left and right. Not really a good thing. But downsizing has hit the Arduino market as well. Look at the Arduino-compatible Skinny from Sparkfun, and the hot-off-the-PCB-printing-press Arduino Nano. The jury's still out on this one...I mean, what happened to bigger is better?!?! But I'm not part of that jury. Smaller means I can cram more of them into my pocket. Try sticking 15 Arduino Diecimilas in your pocket. Seriously. Those things have sharp corners!

Here's one more thing that walked in front of the Honey-I-Shrunk-The-Kids machine. Check out the 6-inch Type-B mini USB cable. What's also sweet about this downsizing is that it fits in my pocket, no tangles. I promise. And it works for pretty much anything with a Type-B mini outlet...like my Lithium BackPack. Or my Blackberry. Or Chris' smartphone (click video to play)


*Guitar not included.

Monday, June 16, 2008

Peddling your (Arduino) wares on Canal Street with the new Hacker's Portfolio

If you're from New York City, you know what I'm talking about, and if you're not, you might still know. Canal Street in NYC holds a place near and dear to my heart and the hearts of many a tourist for being the best place in the world (outside of China) to get cheap knockoff goods. The leather purses that had a rougher feel than the refined counterparts they tried so hard to mimick. And of course the DVDs. But this section of a modern city reminiscent of a Middle Eastern bazaar of centuries past would not be complete without the folks with the briefcases.

With one hand on either side, they were ready to flip open their briefcases at the slightest hint of acknowledgement from a passerby. (Don't make eye contact folks!) Inside was a treasure trove of any high end watch you could imagine, neatly placed on a velvet-covered surface. Shiny and new, but something was not quite right. My personal favorite was the one where all the letter O’s were written as Q’s. Welcome to the world of RQLEX.


The very essence of the sketchy knockoff watch salesman is now captured in the Hacker’s Portfolio—a slim, yet solid portfolio with a fabric-textured hardcover. What’s great is that it can be flipped out easily for presentation, much like the salesman’s briefcase. But even better than velvet, the interior is lined with strips of Velcro, so your hardware won’t go flying off when you’re just a little too eager to show it off to the next passerby. And it's easy to close up and run off in case the cops come running after you.

But seriously, it's pretty cool to be able to show off your stuff in this case, and it comes with 10 mini black protoboards. And strips of Velcro too. Check it out here.

Saturday, June 14, 2008

Redefining the Open Source Hardware Model

Philip Torrone, of Make Magazine and Limor Fried, of Adafruit gave a talk last year at Etech (you can see the slide presentation here- it's interesting and definitely worth a look). They explain hardware as a 7-layer burrito- a number of distinct levels that are necessary for any hardware to function. The astute point they make is that open source hardware can be open on some levels, and closed on others. This is a very fundamental point, and is the core of the model that allows open source hardware to: 1) Generate revenue intrinsically (something open source software couldn’t do) and 2) Exist as a hybrid where convenient, to allow for the most effective use of the community’s resources.

With open source hardware, there are production and distribution costs that don’t exist with open source software. Who foots the costs of production and distribution? Arguably, whoever produces and distributes the hardware can take the profits of doing so. But is it fair for community developers to devote time and prototyping costs if another party will make money from it? It’s an interesting dilemma, because in open source situations, these developers are happy to contribute anyway. Think about Wikipedia. Plenty of people devote time and energy to adding information, though the barriers and minimal unit of contribution is much lower. Now think about it this way: would these people still contribute freely and unselfishly if Jimmy Wales was charging some sort of fee on Wikipedia?

There might be a concept of injustice in the sense that people are happy to work for free if it’s for free and for the greater good, as is the broader cause of open source. But at the point at which it is going towards someone else’s pockets, it’s no longer for the greater good, and so why are you working for free? If there’s money to be made, don’t you want a slice of it? Compounding the situation is the fact that it’s not 5 minutes of your time spent designing a circuit—it’s far more substantial and may involve a cash investment on your part for prototyping purposes.

To circumvent this, a number of licensing approaches have been proposed like the one from TAPR, but rather than proposing a complex licensing or profit-sharing scheme, is there something simpler we can do? Maybe we can just go by the honor system? I’m not sure.
But in the meantime, it may be more efficient to have something closed source. There’s no reason to uphold the principle of open source if it slows down the process of innovation. The multiple, distinct layers of open source hardware design, along with the fact that there is a tangible product involved make the OSH ecosystem potentially lucrative and valuable in a way that open source software failed to be.

If the circuit layer remains closed, PCB components can be designed and manufactured individually. Those who design and manufacture can generate revenue from selling the components they create. From that point on, it can be open source: anyone can piece together the components they want to create the device they want, and write or obtain the open source software that they need. Perhaps developers could agree on a platform like the Arduino, making things truly modular.

Even on the closed source circuit level, individuals can self-organize and collaborate. Everything else is all about the long tail, customization, and piecing things together. This can be open source. The value in here is the network effects of open source on customization. With this system, you get a self-sustaining ecosystem of developer and developer groups designing every possible component, from which any user can choose and create exactly the device they are looking for. Sales come from components, which fund the prototyping, continued hardware development, and the costs of manufacturing. Simple enough, maybe not perfect, but sustainable and open source hardware.

Thursday, June 12, 2008

Current Transformers

Current transformers are now available. Besides being easy to setup and use, these devices are pretty cool looking. Simply slap it on a protoboard and you're ready to start measuring AC or DC current.


The best part about these devices is that you don't have to break the wire to measure the current... simply put the wire through. If you need more gain, you can easily loop the wire through a couple more times.

Picked up a GPS

Here is one of those much talked about GPS boards from Libelium...


The aim here is to get a real working application made with this device and maybe even datalog coordinates.. we'll have to see. I do have a jump start on the coding if I build off of Matt's code from his post GPS in less than 30 mintues.

Wednesday, June 11, 2008

Soooo cool - it's Neko!

Now this is probably the funnest thing yet made for the TouchShield ... it's so neat! Definitely didn't see this one coming :)

Credit of course goes to Josh over at Twilight Edge


You can grab the source code over here.

Tuesday, June 10, 2008

Overcoming the Open Source Hardware Productivity Problem

I mentioned in an earlier post that there are four major barriers to open source hardware development as a community: knowledge, physical skill, time, and money, as well as a few ways the community might overcome these barriers. These potential solutions came from enhancing the knowledge and skills within the community, and then sharing time and money.

However, there is another way of looking at it. You can have a fully functioning OSH ecosystem by letting each person do what they do best. This means that engineers stick to circuit design, and coders can continue to piece modules together and write software. Not to say that one individual can’t learn more or do both coding and circuit design, but the point is to focus on dividing up the large project of OSH design into specific tasks, or layers.

These layers correspond to the processes of design involved in any hardware project. Several leaders in the field have defined it in their own terms, and the layers are generally as follows:
  • Circuit design
  • Component layout and assembly
  • Software/firmware to interface with hardware
Hence, collaboration can happen on multiple levels. For example, freelance engineers may work together to develop a circuit board- the basis for a new component. Alternatively, other individuals may take different components to build a gadget that they then program, specifically to serve their processes.

So this speaks to more ways we can address the knowledge and physical skill aspects of the OSH productivity problem. However, time and money, arguably the most difficult to address, remain unsolved. Part of the issue arises from the tangible cost investment of producing the hardware. Let's say that the circuit is designed in an open source fashion. Who foots the bill for production of hardware? What about prototyping? And who picks up the revenues from sales: the people who designed, or the people who manufactured the circuit?

The logical answer would be to split it. But the financial valuation of design contributions as well as licensing makes it far more difficult for the system to function, not to mention that a system too restrained may even be counterproductive to open source and collaboration. Especially in the world of open source, it is always a complex issue to monetize the product if "the community" built it. I will present a hybrid model for OSH in my next article.

DIY Touchable OLED Timer (using new TouchShield fonts)

Timers are wonderful things used for all sorts of things such as... power switching, lecture class, y2k like events, and more.

Here is a timer application idea and the Arduino code sketch utilizing the 23x35 largeNumFont library on the TouchShield. Tab the screen once to begin, tap the screen to stop, then tap to restart!


To create the above application on the TouchShield,
As always, feel free to change the style to your liking!

Quad core Arduino tower

This is a little project I've been working on for a while now, and I finally got everything working this past weekend. It's a "fully-networked, bus and token-ring enabled, 4-way scalable 'vectorization' of the Arduino" ... um ... or at least that's what this book tells me it is. :-)


This is what it looked like mid-assembly - you can see how I expoxied the 4 Arduinos back to back in a ring, and then placed DoubleTall ExtenderShields around it:


This is the finished project, including some blue LED vanity lights on the inside:


Another angle when it was first assembled:


And finally, here are some videos of it in action - enjoy!


Here's a link to the source code for the command dispatcher, and here's the source code for the nodes. If you're interested, I also have the whole thing up as a kit.

Monday, June 9, 2008

Introducing a handful of useful project cases

You should see the apartment now... there are literally hundreds of project boxes strewn all around me. I've been on a buying binge in search for the perfect set of project boxes, enclosures, and cases for Arduino circuits. In my search, I even got frustrated and built my own case out of carbon fiber. Of all the cases, these are the best I was able to find... in each case (no pun intended), my goal was to find something cheap I could carry with me, and that would protect a simple circuit or Arduino while it sat in my pocket.

MicroCase
A tiny, business-card shaped carrier that fits a Lithium backpack and a simple circuit perfectly:


Purple Zipper ClamShell
Sometimes I just want to carry the Arduino, with a battery, and a simple circuit. This one works perfectly, and you can even fly with it (I've tested it at several airports, and security never questions me like they do when you fly around with exposed components in baggies)!


Circuit Box
You have no idea how hard it was to find something like this. It's basically like a fishing tackle box, but much smaller, and sized just right for resisters, IC's, timers, switches, and LEDs:


Ballistics Pack
I still think this one is so cool, and one of the best cases out there, so here it is again - the Ballistics pack...


Please let me know if you've found any good cases for projects - I'm always on the lookout!

Making a carbon fiber case for the Arduino

I've seen a number of tutorials online recently about how make things from carbon fiber, so I decided to try my hand at it. I wanted to make a carbon fiber case for my Arduino projects - I hope you enjoy!

First, I shaped a piece of artist's clay into the shape of the case:


It looks a little like a cross between a bar of soap and a deck of cards:


Then I wrapped the clay in paper box tape to seal in the clay, followed by a layer of clear packing tape, to seal out the epoxy:


This is what the finished case mold looks like:


And this is what it looks like on the brown paper I placed to contain the mess:


Then, I was ready to start laying the strips of fiber glass on top of the mold (you can also see the plastic cup full of epoxy sitting off to the upper right:


I put about 3 layers of fiberglass down, followed by one layer of carbon fiber. After each layer, I used a paintbrush to brush on some epoxy, and then squeegied it out with a pancake turner:


I let it dry for about 2 hours, and then I was ready to pull the mold out:


The nice part about using clay is that you can scoop it out easily, and pull the mold from the cast:


And voila! The finished carbon fiber case:

Friday, June 6, 2008

Top 5 Snazzy Things in Open Source Hardware This Week

The more time I spend checking this stuff out, the more I want to tell people about it. But it's just not enough to write a blog article about even one or two of these cool things...so I've waited until I had 5.

Now just a disclaimer: snazzy or not snazzy is completely arbitrary and may even depend on my mood today. Also, this is not necessarily even new. It just means I came across it. And liked it. This week. Stay tuned for next week's. Your stuff may be next!

1. Adafruit WaveShield

This might have been around for a while, but I was looking for something to play some quality sounds off my Arduino, and I picked up one of these over at Adafruit. Quality audio…you would think that’s the simplest thing to do, but it’s not! So the Adafruit WaveShield takes care of this in a simple, elegant way. It plays 22KHz, 12bit uncompressed audio files, plays off an SD/MMC, and includes a thumbwheel potentiometer to control volume. No matter how simple a device seems, it’s always way cooler when you build one yourself. You know what I mean.

2. Arduino Nano
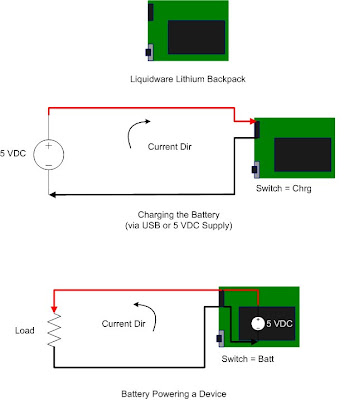
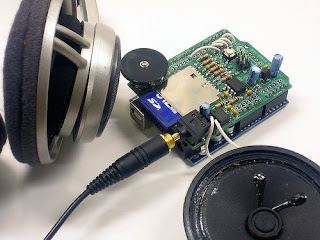
Is it just me or does this world get smaller every day? Maybe I’m getting bigger? Nah. I think these boards are just shrinking. Check this out. Full functionality of an Arduino, the size of a stick of gum. Makes me think of two things: 1) How many of these tiny things can I stack together to give me some intense horsepower in a still tiny device? And 2) How much smaller can they keep making these things? They’re gonna be running iPod Shuffles off these things before I know it! Available June 16th from Gravitech.

3. Sparkfun Projects Case
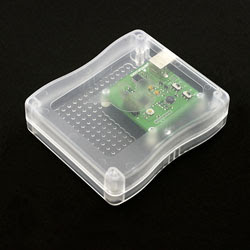
I love bare circuit boards just as much as the next guy. The smell of solder, that familiar dark green…just feels like home to me, you know? But I keep having this issue of not really wanting to take my projects too far—and if I do, I always have to pad it and put it in some makeshift box, then take it out again. Sparkfun’s got a snazzy new plastic case that’s perfect for most projects. Better than putting this stuff in whatever I can find. You can also hold your project in place with standoffs, if it doesn’t fill up the whole case. Best of all? I still get to see what’s inside the clear plastic box!

4. Growduino

I’ve been getting into the green gardening world recently, ever since I bought one of those Aerogarden things at Target. But that thing was close to $200…and pretty much does what Boss Sauce was able to do here. Water, light, nutrients. Controlled by the Arduino. All you need, way cheaper, and way cooler than the Aerogarden.

5. BlinkM, from ThingM
To close this one out, the BlinkM is just something that is so simple and so cool- it could be on my list every week. Maybe it’s the little kid in me, but there is something about blinking, colored lights that just gets me in a trance. Yeah, I’m one of those people who gets the multi-colored blinking Christmas lights and leaves them up in my room all year. What’s that? It’s programmable too? This thing rocks, and no “snazzy” open source hardware list would be complete without it.

Well there you have it folks. The top 5 snazzy things in open source hardware this week. If you know about something snazzy, let me know. Or just come back and see what’s out next week.

Hack CT is tomorrow!!

After a couple get-togethers at the NYC Hack Labs, we thought it might be time for a little field trip to our buddies in Connecticut. The beta release (first ever) Hack CT will be taking place tomorrow, June 7, at Liquidware labs in Farmington, CT.

I don’t know about you, but I’ll take any excuse to get out of the city in the summertime, grill a little and play with this crazy hardware outside. Thanks to everyone who signed up—we’re gonna have a blast! Pics and videos available soon.

Sunday, June 1, 2008

Push it Backwards

Lets face it, the Arduino's profile doesn't lend itself to multiple shield development. So many people have asked us, how do I fit more shields for my increasing complex projects?

One answer is to push your development to the backside.


Shown above is a portable, touchscreen Arduino datalogger which Mike through together in about 2 minutes. Cool huh?