I'm testing Matt's gradient stealer sketch, which is running on each Illuminato X Machina cell, looking speedups due to the cube architecture.
In this 3D mesh configuration, the network architecture allows more nodes to communicate simultaneously, and with shorter hops back to the source, which was my PC.
Up next: Performance speedups by using Oracle bits, and exhibiting quantum acceleration of non-quantum computing, by jumping the mesh.
When I was at the Maker Faire in Providence, Justin remembered that Matt had a Venus flytrap with him that he was going to do some sort of project with. Way back at the end of May, at the Maker Faire in San Mateo, Matt had picked up a Venus flytrap on the way to the airport. It's the little plastic canister right next to his laptop bag.
Here it was on their Maker Faire table getting some air time.
The whole reason was so Matt could snap a bunch of hi-speed images of the flytrap in action. But somehow in the hustle and bustle of the Faire, that never happened. I'm not sure what ever happened to that Venus flytrap, but I thought it might be a fun little app, so I put one together.
The artificial, hack way, I did this (since that's really the only way I do anything :-) was to search Youtube and take some screenshots. I searched for "Venus flytrap closing" and just looked for a video that seemed right.
For screenshots, I like to use zscreen, which is free and open source, and I had to crop some of them using GIMP, but it was pretty simple. I took only 4 shots, and these are by no means the hi-speed shots that Matt was going to take. But I'd just sample more if I wanted the transition to look a little smoother.
I saved these shots as bitmaps, which I then uploaded to the EEPROM on my TouchShield Slide:
When I touch the Slide, the flytrap closes...
Short and sweet, and the project finally comes full circle four months later. I uploaded the code over on the App Store here, in gadget format for the Antipasto IDE.
Here's a video of me (safely) poking my Slide Flytrap with my "stylus"...as a disclaimer, I wouldn't recommend poking a real one!
Last Saturday Chris and I got the Illuminato X Machina IDE (pre-build binaries here, source code here) working on Gentoo Linux. Most users can just install the IDE and start hacking, but if you don't see a device in the IDE menu and your terminal board is powered up, here are some detailed instructions for setting up Linux properly.
Kernel Modules & Devices
The IXM Red Terminal Programmer is a usb-serial device. On my 2.6.28 kernel, the programmer will show up at /dev/ttyUSB0 (or 1, 2, etc.). This device is provided by the usbserial driver in the kernel. You can check for the module easily:
Your distro may have the module built into the kernel instead (that's why you should just try the IDE first). If you need to build the module, you can configure your kernel as follows:
Check off: Device Drivers > USB Support
As module: Device Drivers > USB Support > USB Serial Converter support
Check off: Device Drivers > USB Support > USB Serial Converter support > USB Generic Serial Driver
As module: Device Drivers > USB Support > USB Serial Converter support > USB FTDI Single Port Serial Driver
After building the module, simply sudo modprobe ftdi_sio. You can check to see if the module is loaded with sudo lsmod. Modern Linux distros use udev, which means the device node should be created when you plug a terminal board in. If not you can look at the kernel documentation for usbserial for more information about device nodes.
This year I was lucky enough to sneak out to the Embedded Systems Conference at the Hynes Convention Center in Boston!
This was my first time going to a big event like this with so many embedded systems engineers.
After I got my badge, I saw a great presentation by Robert Brunner from Ammunition to start out my day!
Then I headed to the Exhibit Hall where lots people were showing off their stuff.After that I learned a little about Windows Embedded... they seem to be focusing a lot on a distributed cloud architecture.
I finally got a chance to talk to real NXP team members (from my experience, they are imposable to reach via phone unless you are buying infinity processors). The NXP team knew their products, and were very helpful... they even gave me a free development stick!After that, I headed back to the Exhibit Hall to finish what i started. I grabbed a quick lunch and went to hang out with the guys from Texas Instruments, and they put on a fascinating demo of their Beagle Board, and how they hacked Ant and Make files to get a Linux kernel running on the board.
The day ended for me with a discussion on power optimization for embedded system operating systems...
While Matt, Chris, and Matt B were down in NYC hacking away with Bre at MakerBot, Mike and I went the other way, up to Providence for Maker Faire Rhode Island.
This one was definitely a lot easier to get to than the last Maker Faire out in San Mateo, so we loaded up the Geo Metro and drove off with a few projects and a couple Illuminato X Machina boards. Between MakerBot and Maker Faire RI, this was the first time the Illuminato X Machina boards have really been "out in the wild" :-)
Here's an interesting perspective shot that JB took (thanks!):
It was also pretty neat to see a lot of very different types of projects (e.g., those that don't involve circuit boards) like these reclining, front-pedal bikes that Paul built himself, which mixed household hardware like door hinges with titanium rods used in aircraft structural support.
I wasn't able to make it to Defcon out in Las Vegas this year, so I was thrilled to find out that there's a local and very active community (DC401) right in Providence, and they're hosting QuahogCon in the spring. Notice the interesting life-sized creature in the background. A performance group called BIG NAZO designs, constructs and paints these foam suits in their studios.
As it got dark, the gorgeous Waterfire exhibit lit up the Providence River, drawing crowds to a delicious street fair nearby. There are plenty more pics in a Maker Faire RI Flickr pool as well. All in all, a wonderful way to meet a lot of New England makers and hackers, and special thanks to Brian, Kipp and everyone else who made the day perfect! I'm hoping this will become a tradition...
Cloud processing is all the rage, but everything from privacy concerns to large datasets can be a hinderance. Enter the Illuminato X Machina and the new Ruby LibIXM.
The Illuminato X Machina platform can scale processes to multiple modular segments on the fly. These units are local hardware, not slow remote servers, so IO is cheap. With a library for communication to the host machine, the community can start building powerful libraries.
Those on the Illuminato X Machina mailing list are familiar with the packet interface David Ackley has already written in C++. A partner in that system is the sfbprog binary. sfbprog is meant to auto-program IXMs with new sketches, but through a simple hack can create a packet-based terminal to the Illuminato X Machina hardware:
old_sketch.hex needs to have an older timestamp than the code currently running on your IXMs. Flavor the device and .hex file to taste, and you've got a real-time packet interface to the Illuminato X Machina hardware.
LibIXM and Ruby
The sfbprog terminal is a simple solution, but not something you want to build on top of. Building a Ruby library gives the Illuminato X Machina's community a toe-hold on the desktop machines connected to IXM hardware. LibIXM for Ruby has two levels of abstraction:
Adapters: hardware compatibility layers.
Interfaces: software behavior models.
Currently, the adapter layer is limited to a wrapper around sfbprog. That means all communications with the Illuminato X Machina go over the packet interface, guaranteeing a level of consistency.
The basic interface supported by this first release is Simple. This interface is based off a callback pattern, similar to the Body.reflex already available in the IXM core API.
So Happy Together
Enough talk, let's see some code. This sketch is a basic packet-level echo for the Illuminato X Machina hardware:
void yowl(u8 * packet) {
  facePrintf(packetSource(packet), "You sent me a '%#p'\n", packet);
}

void setup() {
  Body.otherwise(yowl);
}

void loop() {}
And this is a Ruby LibIXM "yodler" built off the sketch:
The Illuminato X Machina's are modular, which means they can be connected to each other to distribute tasks and to adapt to their environment (or ecosystem, if you will). This is a little blog about how I wrote a sketch that makes all the IXM's act like a team to generate a network map representation of how they're connected to each other.
That way, something like this (note a 3d printed model of the Empire State building that Bre printed):
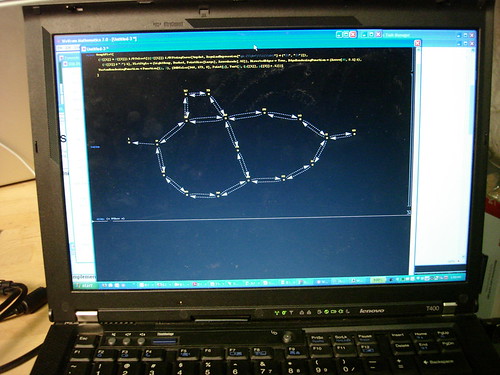
Turns into a representation on the computer like this:
Here's an up-close screenshot that I made with Mathematica (I wish I knew Octave or SciPy better, but I taught myself Mathematica a long time ago for some math homework in school, and I don't even think SciPy existed back then):
Here's a video of me YELLING REALLY LOUD BECAUSE I DIDN'T REALIZE how well the junky little video recorder I have could pick up my talking with the music right near me (ps thanks a lot, sony for making me carry around your stupid proprietary upload cable everywhere):
This is probably my favorite video ever, because it shows the Gradient auto-discovering topology sketch gradually figuring itself out, and updating as it gets new packets in real time:
So basically, if I had gray hair, and was born in the 1930's and worked at Los Alamos National Labs building supercomputers all the time, I would probably call this something like a "self-discovering topologically ambivalent computer achitecture with peer-to-peer team-based self-discovery." But I'm not, I don't, I didn't and so instead this is just "a simple little sketch that let's you connect the IXM's in any configuration, and it prints on the screen a network map version of the physical arrangement of the IXM nodes."
How I did it...
I adapted the packet gradient sketch (more on that to come, but if you're on the illuminato@googlegroups.com mailing list, you probably saw me post it a week or two ago), and I made a simple packet system that does the following:
"qz0" - reset the grid
"t0" - establish a gradient back to the PC
"i0" - hey, every IXM cell go generate a random number between 1-1000 and store it
"qzN" - tell me (the PC) what the cell ID is for the IXM connected directly to me (PC)
"qn0" - ok, now every IXM cell in the grid, exchange id's with any neighboring grids you're connected to
"ndN1" - I'm the PC, so my id is '1', and I'm at your North edge
"qp0" - ok, now everyone report up which id's you're connected to in the format of E123|456, where 123 is your id and 456 is the id of the IXM cell to the East of you
"qz0" - reset all your id's and get ready for the next thing I want you to do, which is probably go generate another edgelist and send it back up the gradient after I changed your layout by reconnecting you all in a different way
I've uploaded the sketch file up to the Liquidware "app store" over here, and I made a new icon for any app that I write for the IXM:
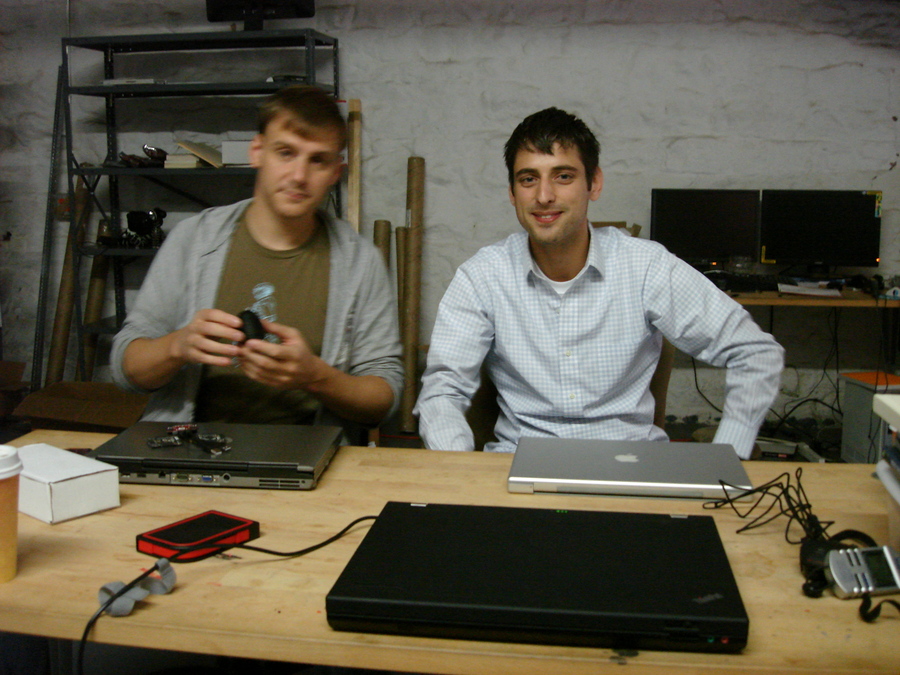
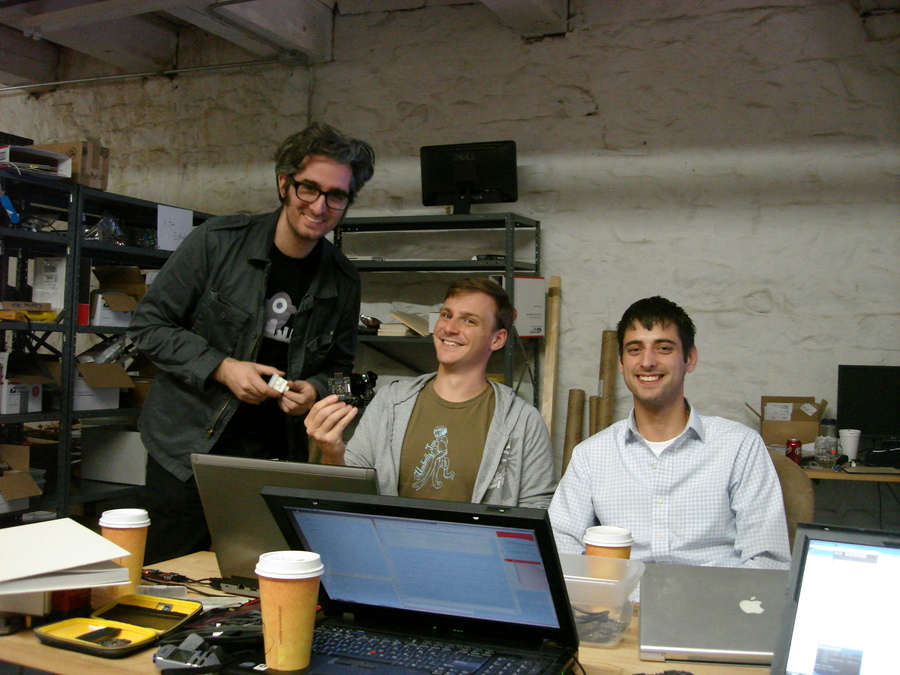
And here are some more screenshots of different topologies Chris, Matt, and I were experimenting with on a desk at Makerbot:
The "magic" all happens in the sketch with this code right here, which shows off the packet functions that Dave wrote overnight in his sleep :-)
//expect to parse packet of "qxN\n" for send me your id, or "qn0\n" for get your neighbors' id's
//or "qd4214\n" for the actual id, or "qs123\n" to set your id to the number specified
//or "qp0\n" for send all your neighbor info packets back
//or "qz\n" for reset
void doNeighborIdentify(u8 * packet) {
  u32 sourceface, thispacketmyngen, thispacketmypgen, thispacketmyrgen;
  int tempface;
  long tempnid;
  u8 t;

  if (packetLength(packet) < 2) return;
  sourceface = Body.source();

  //reset gradient signal tokens
  if (packet[1] == 'z') {
    thispacketmyrgen = packet[2] - 48;
    if (thispacketmyrgen <>=1000)) {
      //only run request on the first packet i get with lowest n
      //or if a second has ellapsed
      myrgen = thispacketmyrgen;
      last_millis_reset_packet = millis();
      myidgen = MAXNBYNSIZE;
      myngen  = MAXNBYNSIZE;
      mypgen  = MAXNBYNSIZE;
      //myrgen  = MAXNBYNSIZE;
      deus_terminus_hop[DEUSNORTH]=MAXNBYNSIZE;
      deus_terminus_hop[DEUSSOUTH]=MAXNBYNSIZE;
      deus_terminus_hop[DEUSEAST] =MAXNBYNSIZE;
      deus_terminus_hop[DEUSWEST] =MAXNBYNSIZE;
      neighbor_ids[DEUSNORTH]=0; neighbor_ids[DEUSSOUTH]=0; neighbor_ids[DEUSEAST]=0; neighbor_ids[DEUSWEST]=0;

      //myidgen, myngen, mypgen, myrgen
      //println("qz");
      if(sourceface != NORTH) { facePrint(NORTH,"qz"); facePrint(NORTH,myngen+48+1); facePrintln(NORTH); };
      if(sourceface != SOUTH) { facePrint(SOUTH,"qz"); facePrint(SOUTH,myngen+48+1); facePrintln(SOUTH); };
      if(sourceface != EAST) { facePrint(EAST,"qz"); facePrint(EAST,myngen+48+1); facePrintln(EAST); };
      if(sourceface != WEST) { facePrint(WEST,"qz"); facePrint(WEST,myngen+48+1); facePrintln(WEST); };
    }
  }
  //send me your id in a packet of "qdN4214\n" for example
  if (packet[1] == 'x') {
    facePrint(sourceface,"qd");
    if (packet[2]=='N') facePrint(sourceface,"N");
    if (packet[2]=='S') facePrint(sourceface,"S");
    if (packet[2]=='E') facePrint(sourceface,"E");
    if (packet[2]=='W') facePrint(sourceface,"W");
    facePrint(sourceface,myid); facePrintln(sourceface);
  }
  //set my id to the number you specified
  if (packet[1] == 's') {
    packetScanf(packet,"qs%d\n",&myid);
  }
  //set my neighbor_id's array to the id's of my neighbors
  if (packet[1] == 'd') {
    packetScanf(packet,"qd%c%d\n",&t,&tempnid);
    if (packet[2]=='N') neighbor_ids[DEUSNORTH] = tempnid;
    if (packet[2]=='S') neighbor_ids[DEUSSOUTH] = tempnid;
    if (packet[2]=='E') neighbor_ids[DEUSEAST] = tempnid;
    if (packet[2]=='W') neighbor_ids[DEUSWEST] = tempnid;
  }
  //query my neighbors, then propagate the requst outwards
  if (packet[1] == 'n') {
    thispacketmyngen = packet[2] - 48;
    if (thispacketmyngen < myngen ) {//only run requst on the first packet i get with lowest n
      myngen = thispacketmyngen;
      //query my neighbors
      facePrint(NORTH,"qxN");facePrintln(NORTH);
      facePrint(SOUTH,"qxS");facePrintln(SOUTH);
      facePrint(EAST,"qxE");facePrintln(EAST);
      facePrint(WEST,"qxW");facePrintln(WEST);
      //propagate the request outwards
      if(sourceface != NORTH) {
        facePrint(NORTH,"qn"); facePrint(NORTH,myngen+48+1); facePrintln(NORTH);
      }
      if(sourceface != SOUTH) {
        facePrint(SOUTH,"qn"); facePrint(SOUTH,myngen+48+1); facePrintln(SOUTH);
      }
      if(sourceface != EAST) {
        facePrint(EAST,"qn"); facePrint(EAST,myngen+48+1); facePrintln(EAST);
      }
      if(sourceface != WEST) {
        facePrint(WEST,"qn"); facePrint(WEST,myngen+48+1); facePrintln(WEST);
      }

    }
  }
  //send neighbor packet pairs back
  if (packet[1] == 'p') {
    thispacketmypgen = packet[2] - 48;
    if (thispacketmypgen < mypgen ) {
      mypgen = thispacketmypgen;
      //print up my report-outs
      ledOff(redPin); ledOff(bluePin); ledOn(greenPin);
      if (neighbor_ids[DEUSNORTH] != 0) facePrintf(sourceface,"qrN%d|%d\n",myid,neighbor_ids[DEUSNORTH]);
      if (neighbor_ids[DEUSSOUTH] != 0) facePrintf(sourceface,"qrS%d|%d\n",myid,neighbor_ids[DEUSSOUTH]);
      if (neighbor_ids[DEUSEAST] != 0) facePrintf(sourceface,"qrE%d|%d\n",myid,neighbor_ids[DEUSEAST]);
      if (neighbor_ids[DEUSWEST] != 0) facePrintf(sourceface,"qrW%d|%d\n",myid,neighbor_ids[DEUSWEST]);
      //propagate the request outwards
      if(sourceface != NORTH) {
        facePrint(NORTH,"qp"); facePrint(NORTH,mypgen+48+1); facePrintln(NORTH);
      }
      if(sourceface != SOUTH) {
        facePrint(SOUTH,"qp"); facePrint(SOUTH,mypgen+48+1); facePrintln(SOUTH);
      }
      if(sourceface != EAST) {
        facePrint(EAST,"qp"); facePrint(EAST,mypgen+48+1); facePrintln(EAST);
      }
      if(sourceface != WEST) {
        facePrint(WEST,"qp"); facePrint(WEST,mypgen+48+1); facePrintln(WEST);
      }
    }
  }
  //i got a report-out packet, send it back to the path of the deus, least-hop gradient
  if (packet[1] == 'r') {
    tempface = getDeusMinHopDir(); //direction of upstream gradient
    facePrintf(tempface,"%p\n",packet);
  }


}
Just in case, here is a link to more Flickr pictures, and some other videos I took while at Makerbot.
This past weekend was like that movie Road Trip, except without the really awkward moments crashing that frat house in the middle. While Justin and Mike went to the Rhode Island Maker Faire, Chris, Matt, and I went down to NYC to meet up with Bre Pettis from Makerbot Industries.
I also put the finishing touches on my two work-in-progress sketches, called the "Gradient" Sketch and the "Self-Discovering Topology" Sketch. I'll upload a blog in a second that describes what the Gradient and Self-Discovering Topology sketches do... but first!
This is Matt looking like he normally does... all "shifty" if you know what I mean... although I have no idea how he moved faster than the frame rate set on my camera. Matt's like that though, sometimes he just moves faster than the speed of light just for kicks.
And here's a picture with Bre in it... everyone got in a photo except me, since I took most of them:
Usually when I talk about hacking hardware and programming boards, I find myself talking about an IDE- an integrated development environment. The notion of the development environment, however, places a much heavier emphasis on the software than on the hardware.
I think it's much more than that. It's not just the interface that's used to program, but also the hardware, software, and firmware modules involved, how they behave, how they react and interact. Matt talked about the Illuminato X Machina units as autonomous cells that each had specific abilities, could sense and reflexively respond to each other, and could even influence the behavior of their neighbors.
Robust physical computing and living computation, is built on this concept as well and takes it one step further. It's similar to thinking about everything as a set of interactions between living organisms that are part of an ecosystem.
There are a few other specialized members of the Illuminato X Machina robust physical computing ecosystem that make it a little more diverse and much more functional.
Cells
First is the Illuminato X Machina Red Terminal Programmer. The red terminal is a special cell that serves a specific function: relaying information directly to a set of neighboring cells. It has 3 onboard type B-mini USB connections, each equipped with its own FTDI chip so they can be independently controlled. Each USB connection is then linked to a single face, to offer independent control of each of its neighbors through the computer. With 2 USB ports connected, the Red Terminal will be able to provide enough power for just a small grid of IXM cells to program on the fly. Since the Red Terminal's unique role is to serve as a conduit for information and power, it does not have a microprocessor of its own. Much like a red blood cell that it lacks a nucleus because its shape has evolved to specialize as an oxygen carrier.
Below is a shot I took of the Red Terminal in action:
Next is a more powerful cousin of the standard Illuminato X Machina cell, dubbed the Weapons Grade cell. It's equipped with white LEDs, as well as current sensing and incoming power defense on all four edges. The more complex power routing capabilities on the Weapons Grade cells make them essential for grids experimenting with advanced power-related applications. For most conventional grids, they usually serve specific roles, and may simply be sprinkled across a tribe as neeeded. Or maybe because they look like UFOs :-)
Connectors
The 7-pin Intercellular Matrix Headers are the glue that holds Illuminato X Machina cells together, both for structural integrity of the array, as well as for communication purposes. Either 1 or 2 can be used to bridge two cells together, depending on whether the extra connection on the opposite face of the cell is necessary.
The IXM programmer cable connects to a USB port on the computer end, and has a 7-pin male header on the opposite end, essential for programming directly to any board. It's especially useful with large arrays or tribes, where I don't want to keep moving my programmer board around to connect to a particular cell edge.
Next, the IXM power supply provides a 7-pin interface directly onto an Illuminato X Machina cell. It pumps out 12 V at 4.5 Amps, which is enough to power up to 30 cells. Plugging into any cell edge on the grid (or any other configuration) will power the entire set of interconnected cells, due to the adaptive power sharing and distribution.
Finally, the shrapnel resistant type B-mini USB cables are here mostly because they're neat and extremely durable, and they also match the black and gold of the Illuminato X Machina board. The tough woven polymer cable encasing match the robustness of the network...and are just plain fun to have.
Well, those are all the ones for now, and a quick way to view them all is to select the "Illuminato X Machina" category over on the shop. Of course, if anyone comes across a yet-to-be-discovered species, I'm all ears...jhuynh at gmail dot com
The Eli WhitneyMuseum in Hamden, CT is hosting a maker meetup on September 23, at 7:30 PM. In case your elementary school American history is a little rusty (because mine was), Eli Whitney invented the cotton gin, among other things, and his inventions are credited with helping to drive the US industrial revolution
Museum Director Wm Brown will be giving a talk called Eli Whitney invented MAKE to kick-off this series of maker meetups, especially since the modern-day maker embodies many of the qualities that made Eli Whitney a successful inventor.
What: New Haven Maker Meetup When: Wednesday, September 23, 7:30 pm - 9:30 pm
Where: Eli Whitney Museum (directions) 915 Whitney Avenue Hamden, CT 06517 (203) 777-1833
Like many of the exhibits and events at the Museum, it will be an open forum as well as a hands-on workshop. Bring whatever projects, tools, and parts to hack, experiment, and collaborate with other makers. Or try out projects from the Museum and fellow tinkerers. I'll be bringing some of my favorite gadgets too.
Let me know if you need directions from NYC or Boston as well - jhuynh at gmail. See you there!
I've noticed some really neat shields from some other folks in the Arduino community, so I picked up a few and put them over on the shop page under "Community".
The first one is the ScrewShield, from WingShield Industries. The guys at Wingshield had a brilliant and unconventional perspective on shields: why do shields have to face inward? Thus the "wing-format" shield was born. Each wing mounts on a row of Arduino headers and extends outwards. The stack-through headers are linked to a corresponding set of screw terminals, allowing wires to be secured to pins (instead of having them fall out of breadboards or the pin headers themselves all the time).
The next one is the WiShield from Asynclabs, which is a compact board carrying an 802.11b WiFi module. I've got my Freedom Kit to talk through XBee and EthernetShield for LAN, but now I can take my Arduino over to Panera and still stay connected to the Internet. It's also got a set of stack-through headers that replicates the Arduino pins, as well as an extra unsoldered row of pins.
Maybe I'm being greedy, but I'm wondering if it's possible to hack a WiShield, EthernetShield, and TouchShield Slide together to make an Open Source, DIY Wireless Router (that also has an interface for readout). It fits together nicely because the WiShield is a little shorter, and doesn't get obstructed by the RJ45 jack on the EthernetShield.
The last one is one I've had for a little while, but didn't have time to try out until now. As the name suggests, the VoiceShield from Spikenzie Labs records and plays back sounds (preferably voices). What I thought was really neat was the fact that the sound could be divided into snippets on specific memory addresses. So each sound can be recalled on command. It's great for those Wall-E type noises when my TankShield scurries across the room and into a wall.
There's also a slot for a 15mm speaker, as well as audio in and audio out jacks. I'm starting to notice a trend with the stack-through pin headers too, and these conveniently provide access to the pins covered up by the shield itself. Well, that's it for now. I have a couple more on the way, but I'm always looking for new and interesting boards, so feel free to drop me a line if there's something neat I haven't checked out - jhuynh at gmail...


![[003+Matts+luggage.jpg]](http://2.bp.blogspot.com/_pGsJFsc5Buc/SiPmMWjDJWI/AAAAAAAAAQE/padLXYq-V-w/s400/003%2BMatts%2Bluggage.jpg)
![[004+Liquidware+kits+and+toys+on+the+table.jpg]](http://4.bp.blogspot.com/_pGsJFsc5Buc/SiPmMlGQYfI/AAAAAAAAAQM/orGy1js5hBo/s400/004%2BLiquidware%2Bkits%2Band%2Btoys%2Bon%2Bthe%2Btable.jpg)

 Short and sweet, and the project finally comes full circle four months later. I uploaded the code over on the App Store
 After that I learned a little about Windows Embedded... they seem to be focusing a lot on a distributed

 I grabbed a quick lunch and went to hang out with the guys from Texas Instruments, and they put on a fascinating demo of their Beagle Board, and how they hacked
  Can't wait till ESC Boston 2010!


